 |
||
Making Mosaic Flower PotsMosaic flower pots are nice with just broken tiles but if you want you can add a flower mosaic pattern or use a border pattern that would go all around, or a combination of both. The materials and tools you will need are;

If you are going to make your flower pot using only broken tile then you will need to break left over tile into smaller pieces. It is safer to insert your tile between sheets of newspaper or old cloth and then hit it with the hammer. Remember to always work safely and wear your safety glasses here. Even sandwiched between paper or cloth small pieces can fly up to your face. 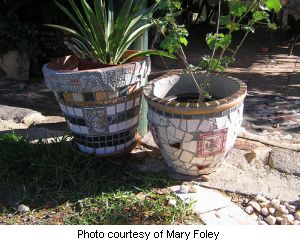
If you decided to make your flower pot using a pattern, lay it out on a table first. Once you are satisfied with the look you can then transfer it to your flower pot. The next step consists of gluing your pieces to the flower pot. You can either spread a tile adhesive directly on the pot or you can apply a tube glue, such as liquid nails, directly on the back of each piece. Whatever method you use, keep your tiles about 1/8 to 1/4 inches apart. After the tiles have set for at least 24 hours you can grout the flower pot. Mix your grout according to the instructions on the package. To apply the grout on a round surface it is easier to use your hands to push the grout into the grout lines rather than using a grout float. Rub your hands all over making sure you entirely fill all grout lines. Always wear a good pair of rubber gloves for this step. Now to preserve your new mosaic flower pot it is recommended to seal your grout lines. I let my grout dry completely for about 5 to 7 days before applying the sealer. Now that you are finished you will want to make more, a mosaic flower pot looks much better with others! Return to Previous Page from Mosaic Flower Pots Return to Making Mosaics Home Page |
More Mosaic Projects
Mosaic Tables Mosaic Mailbox Mosaic Flower Pots Mosaic Stepping Stones Mosaic Tile Birdbath Mosaic Shower Stalls Mosaic Trivets, Mosaic plaques or Coasters Mosaic Picture Frames Mosaic Candle Holder |
|
|
All rights reserved. No reproduction without permission. Privacy Policy
|
||


New! Comments
Have your say about what you just read! Leave me a comment in the box below.