 |
||
How to make a mosaic mailboxA mosaic mailbox is a great project to do with your children. Making it out of pieces purchased online or in a craft store or just using left over pieces from your last floor tile project, a mosaic mailbox will give the front of your house a one of a kind look! 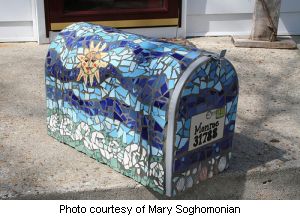
First you will need a mailbox usually available at any home center or hardware store. Available in many sizes, pick one out that will accommodate your mail. Commercially made mailboxes today are made of metal or wood. These two types are acceptable, but if you live in an area where you have very cold winters I recommend steel. Even though steel has some expansion and contraction it is not as much as wood. Which ever type of mailbox you get I recommend painting it before starting your mosaic. This will help protect it from the elements. Use colors that will enhance your design. Next step, if not already done, should be selecting your mosaic art patterns. You can do just about anything from borders and geometric shapes to nature scene such as flowers or trees. One nice touch is to add your door number to your mailbox. Now assemble all your materials, the main thing to remember here is that it is best if all your pieces are of the same thickness, this will give your mailbox a more even exterior and make it easier when you come to apply your grout. Now reproduce your mosaic pattern on a flat surface such as a piece of cardboard which would be as close as possible to the real size. Take your time here and re-arrange your pieces as many times as you want, until it is perfect according to you! Once your design is approved by you then you can transfer it to your mailbox. Again here I recommend using either liquid nails or no more nails. With either one of these products your pieces will never move even in the coldest climate. 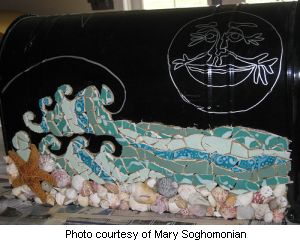
One thing I do here to help me is to start and apply only one row of pieces to my mailbox and wait until it dries. This helps me later on and gives me a reference point when applying the rest of the tesserae on the mailbox. Another thing you can do I draw the pattern directly on your mailbox. Then fill in the areas with your tiles When all your pieces are glued and have dried for at least 48 hours, it is time to grout your mailbox. Use an exterior grade sanded grout, and for added security you can add a waterproofing acrylic additive agent to your grout. Finally when grout has dried for a few days you should seal it with a grout sealer. Now you are finished, all you need to do is install your mailbox and wait for the mail. Return to Previous Page from Mosaic Mailbox Return to Making Mosaics Home Page |
More Mosaic Projects
Mosaic Tables Mosaic Mailbox Mosaic Flower Pots Mosaic Stepping Stones Mosaic Tile Birdbath Mosaic Shower Stalls Mosaic Trivets, Mosaic plaques or Coasters Mosaic Picture Frames Mosaic Candle Holder  |
|
|
All rights reserved. No reproduction without permission. Privacy Policy
|
||


New! Comments
Have your say about what you just read! Leave me a comment in the box below.