 |
||
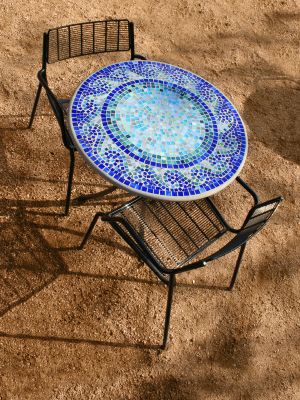
Making A Mosaic Table TopA mosaic table will add life to any decor. First you will need to find the appropriate table to mosaic. This can actually be very easy. Look for an old table you won't mind covering up. Scratches or chipped paint is not a problem, as long as it is still solid. You can put that table that has been hiding in the garage to good use. If you do not have an old table you can find one in a garage sale. Once you have that table picked out, maybe you will want to stain or paint it. It is best to do it now before you mosaic it. Chose a color that will blend in well with your mosaic, bright colors in your mosaic gives you the opportunity to be creative, however with muted colors you might want to use a light colored stain or paint.
Once you have decided on a pattern, and selected your materials, find a piece of cardboard that will match the size of your table top to mosaic. Start laying your pieces on the cardboard, working from the middle going towards the edges, like a puzzle. Make sure your pieces do not tough each other, minimum of 1/8 of an inch gap. Now you can take your cardboard filled with your pieces and place it on the table you want to mosaic. You do this just to test your mosaic. Take time to look at it, you can even ask friends or family to look. It is still easy to move or rearrange pieces when they are not glued! When you are happy with your design, carefully remove your cardboard off the table and place it to the side. Before spreading the glue onto the surface to mosaic, pass a vacuum cleaner to remove all lose debris or dust. Now spread the glue onto the table top and transfer all the pieces from the cardboard to the table top. 24 to 48 hours after gluing your tesserae onto your table top it is now time to grout your mosaic. Use a dry premixed, sanded grout. Check out this page for details about grouting your tiles. Now that you are finished, step back and admire your new mosaic table! Remember, all you need is your imagination, so work safely and have fun! Return to Previous Page from Making a Mosaic Table Return to Making Mosaics Home Page |
More Mosaic Projects
Mosaic Tables Mosaic Mailbox Mosaic Flower Pots Mosaic Stepping Stones Mosaic Tile Birdbath Mosaic Shower Stalls Mosaic Trivets, Mosaic plaques or Coasters Mosaic Picture Frames Mosaic Candle Holder |
|
|
All rights reserved. No reproduction without permission. Privacy Policy
|
||
 Now plan out your mosaic design, it can be anything. A mosaic made from broken pieces is very nice. It can be any geometric design such as


